When raising chickens, special attention must be paid to the competent organization of the feeding process. To do this, first of all, you need to acquire high-quality and convenient feeders. They can be purchased in a specialized store or made with your own hands, using available materials and diagrams. What kind of feeders should be and how to make them with your own efforts, read below.

Feeder Requirements
A feeder for layers or broilers should have a number of characteristics:
- Made of durable material. For the manufacture of the feeder, you need to use a strong material that has a minimum tendency to deformation and damage during operation. In addition, the material should not have harmful properties, otherwise it can negatively affect the health of chickens during feeding.
- It has optimal sizes.. The feeder should have a sufficient volume to feed the entire livestock of birds for the whole day. To determine the optimal size, it is worth considering such a norm: 10-15 cm of length should be allocated for each chicken in the feeder. For chickens, this rate is reduced by 2 times. However, if the tray has a circular shape, then 2.5 cm is sufficient for each individual. It is desirable that all birds have access to food at the same time, otherwise stronger individuals will push back the weak ones.
- Low maintenance. Fill the feeder every day. In addition, it is regularly necessary to clean and wash it, as well as to disinfect it. All these processes should not cause difficulties for the breeder. For these purposes, it is better to produce lightweight structures that can be easily moved, washed and other manipulations to prepare it for further operation.
- Provides a rational distribution of feed. The feeder should be designed so that the chickens cannot climb into it, scatter the feed and spoil it with their excrement. For these purposes, care should be taken to install protective bumpers, turntables and other devices to strengthen the main fodder mass inside the tank. In addition, the shape of the feeder must be stable so that the birds do not overturn it.
The feeder should be arranged so that all chickens have access to feed, and stronger individuals do not crowd out weaker birds.
Types of designs
They are classified according to various parameters, each of which we will consider separately.
By material
Properly selected material for the feeder is the key to the safety of the feed, which means that it is also economical. It could be:
- Wood. Wooden feeders are one of the most common options, as they are great for filling dry feeds - grain, animal feed, various mineral additives. In addition, wood is a natural material that provides the product with durability.
Wooden feeders should not be used for raw food, as its remnants will stick in hard-to-reach areas of the structure, and then they will begin to rot and infect fresh food with pathogenic bacteria.
- Plastic. Chickens must be introduced into the diet of the mash. It is best to pour wet food into plastic feeders, since food debris is easily removed from their surface. However, in this case, special attention will need to be paid to the choice of high-strength plastic.
- Metal. Like the previous material, it is suitable for the manufacture of containers in which you can pour moist mixed feed. It can also be used to make bins for green grass. However, it is worth considering that black material is prone to rust under the influence of moisture, and stainless steel is quite expensive.
Chicken feeders are predominantly made of wood and plastic, the choice among which depends on which feed is planned to be used in the future.

By feed method
The convenience of feeding the bird will depend on the type of food being fed to the feeder, as it is much more convenient to pour the food once a day, and not several times at short intervals. Here are the optimal feeders for the type of food:
- Tray. The simplest designs that are suitable for feeding young animals. The tray model is a simple container with sides that prevent food spills. As a rule, such a feeder has an elongated shape.
- Grooved. Similar designs are complemented by a spinner or demountable removable grating (mesh). Inside, they are divided by partitions into several compartments (compartments) intended for different types of feed. Groove feeders can be placed outside the borders of the cage, so that hens reach the feed only with their heads. This will greatly simplify not only the feeding process, but also the cleaning of the container.
- Hopper (automatic). Used for feeding dry food. Their main advantage is that it is enough for the breeder only in the morning to pour compound feed or grain into the feeder. This volume will be enough for birds to feed for a whole day. The design of such devices is such that the feed enters from the closed-form hopper into the trays as necessary, therefore, during the day it is not contaminated and remains dry.
By placement
Depending on the location in the chicken coop, there are two types of feeders:
- floor - mobile structures that can be installed in any part of the cage or house;
- mounted - constructions that are fixed to the wall of the house with the help of special brackets or holding devices, therefore they are stable, which compares favorably with mobile feeders, which can be overturned by chickens.
Some poultry farmers simultaneously use both types of feeders, since each of them has its own advantages.
Varieties of homemade wooden feeders
There are various options for wooden feeders, which we offer to familiarize themselves with in more detail.
Bunker feeder from pieces of wood
Great for those breeders who do not have the ability to periodically add grain.

To assemble a similar design, first of all, you need to prepare:
- solid plywood or wood planks;
- electric drill, set of drills;
- a pair of loops;
- sand paper;
- a saw;
- screwdriver;
- pencil;
- roulette.
The bunker feeder manual looks like this:
- Draw a drawing, which then transfer to the tree, carefully drawing the details of the future design:
- bottom - 29x17 cm;
- two side walls 40 cm high, 29 cm long (a wedge will need to be cut in the side walls, as shown in the diagram below);
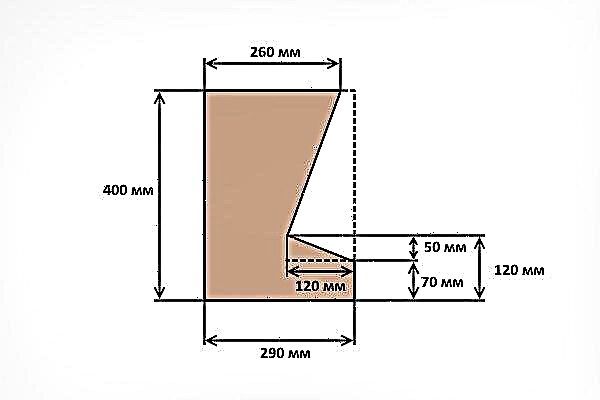
- two rectangles for the front wall - 28x29 and 7x29 cm;
- top cover - 26x29 cm;
- back wall - 40x29 cm.
- Cut out all the details, moving along the drawn marker lines.
- Drill holes for screws in the required places using an electric drill.
- Sand the entire surface so that the feeder is smooth and safe for birds.
- Assemble all the elements into a single structure with screws. To achieve maximum density, use a clamp. In addition, it should be borne in mind that the rear and front walls must be connected at an angle of 15 °.
- Attach the cover to the rear of the side walls using hinges.
- Treat the feeders with an antiseptic, remembering that the use of paints and varnish is strictly prohibited.

The assembled feeder will turn out to be roomy and comfortable, working in automatic mode.
An example of a hopper feeder assembled from wooden blocks is given in the following video:
Trough feeder
It is a simpler design, suitable for those who keep a large number of chickens.
To assemble the structure you will need:
- thick boards or plywood;
- a hammer;
- wood screws or nails;
- saw;
- pencil;
- roulette.

The feeder can be assembled according to the following instructions:
- Draw a diagram of the future feeder, pinpointing all the elements, their dimensions and the installation location of the fasteners.
- Transfer the drawing to a tree in accordance with the parameters specified in the drawing above.
- Cut all structural parts along marker lines. It should be borne in mind that the bottom should be thick and heavy, otherwise the birds can easily turn the feeder over. In addition, the height of the walls should be convenient for chickens.
- Connect all the parts together, leaving no gaps, because through them the feed will fall out. Additional wood processing is not necessary.
Such a feeder is durable and strong, and also versatile in relation to the type of feed used, that is, it is suitable for supplying both dry and wet feed.
How to assemble a wooden chicken feeder is described and shown in the following video:
Double decker feeder
This option is mainly used for dry food, although various mixers can also be served in it. Such a feeder can be made for a small room, since the second tier allows you to compensate for the shortage of free space. It looks like this:
Having prepared the bars and screws, you can begin to assemble the feeder:
- Prepare all the details of the future feeding trough. Among them, the main one is the lower tier with a length of 40 cm and a width of 50 cm. The length can be adjusted according to the number of livestock. The second floor is a small filling hopper - a trough with a front wall height of 10 cm and a rear wall of 20 cm.
- Make a damper that will divide the lower tier into 1/3 parts.
- Install the second floor at the ends of the first.
- Attach a lid that will cover the feed from getting inside the debris.

Varieties of PVC pipe feeders
For the manufacture of plastic feeders, farmers often use PVC pipes, because they are unpretentious and quite practical - they do not need to be drilled, welded or glued. Various options for feeders from such pipes will be considered below.
With tee
This design has a "standing" shape. To make it, you will need:
- sewer pipe 1 m long;
- 2 plugs for PVC pipes of the appropriate size;
- tee with an angle of 45 °;
- a device for cutting plastic pipes or saws for metal.
The tee feeder manual looks like this:
- Cut the plastic pipe into 3 parts - 70 cm, 20 cm and 10 cm. It should be noted that initially it is possible to purchase pipes of the right sizes so that later they do not have to be cut.
- Take a pipe 20 cm long and put a plug on one end of it. Thus, it will be possible to get the foundation, that is, the bottom of the structure.
- On the other end of the pipe, fit the tee with the side elbow up.
- Insert a pipe 10 cm long into the side hole.
- Insert a pipe 70 cm long into the third hole of the tee and close it with a second plug from the other end to get the finished structure.
The assembled feeder at both ends (lower and upper) should be attached to the wall of the chicken coop using a wire. Of course, it is easier to fix it on an iron grid or support rails. Once the feeder is in place, it can be filled with food. Hens will peck feed from the side opening of the tee without scattering it on the ground. For 15-20 broilers or 30 layers, this amount of food is enough for a day.
At night, the top of the feeder must be covered with a plug, otherwise foreign objects, debris and bacteria will fall into the feed.
How does the feeding trough from the sewer pipe look like in the following video:
With cutouts
This design will consist of two pipes, one of which will be installed horizontally and will serve to feed the birds, and the other will be installed vertically and will serve to supply grain.
Here are the necessary materials and tools:
- 2 pieces of pipe - 50 cm and 30 cm or 60 cm and 40 cm;
- PVC elbow for pipe size;
- 2 stubs;
- drill, jigsaw or electric saw.
The procedure for manufacturing the feeder is as follows:
- On a long pipe, draw 2 or more holes with a diameter of 7 cm and with the same step. They can be oval, round or rectangular.
- Make a hole with a drill, and then cut it with a jigsaw. If desired, cutouts can be made on both sides.
- Put a plug on one end of the pipe, and install a bend on the other end, into which the other pipe is inserted.
- Fasten the finished feeder to the wall of the chicken coop using a wire. It is best to fix it on both sides - above and below. As in the previous version, you need to pour grain into the upper pipe, and then close the hole with a second plug so that debris does not get into it. It is necessary to fill such a design 1-2 times a day.
A method of manufacturing a feeder with two rectangular holes is demonstrated in the following video:
Broiler hopper feeder
Such a feeder can be made for broilers from 2 weeks old, and this will take no more than 20-30 minutes. One load is enough to feed 30 heads of chickens throughout the day.
To collect the feeder you will need:
- a piece of plywood or a wooden board measuring 20x20 cm and a thickness of 8-10 mm (the thicker the base, the more stable the finished structure will be);
- plastic canister measuring 20x20 cm;
- PVC pipe for sewage (section 10-15 cm high) and for water supply (section 25-30 cm high);
- adhesive tape or electrical tape;
- mounting angles, nuts, screws, nails;
- a hammer, a saw, an awl and a piece of rope.
Having prepared everything you need, you can start assembling the feeder:
- Fasten a wide piece of pipe to the base of the structure (plywood or board) using mounting angles and screws. It is enough to attach 2 corners opposite each other from the inside of the pipe.
- Take a smaller pipe and cut it along the diameter of the hole to a height of 10-15 cm. Next, make a transverse incision, which should converge with the longitudinal one. Thus, you get a pipe with a cut out half of the bottom.
- Insert a thin pipe inward with a wide cut into the feeder, and then connect both pipes with two screws - above and below.
- Cut the bottom of the plastic canister, and then put its neck on a narrow pipe. The joint should be wrapped with tape or electrical tape.
- In the canister, closer up, make a hole through which to stretch the rope.
- On the wall, where it is planned to install a feeder, nail carnations at the level of the rope. Fix the structure so that it is stable, and the chickens could not turn it over.
In the following video, it is proposed to learn more about the characteristics of the collected feeder:
Options for feeders from improvised materials
Chicken feeders can be made from improvised materials that lie in almost every yard or house. Consider several popular options.
From a cutting board
Necessary materials and tools:
- wooden cutting board;
- plastic funnel;
- a small plastic cup;
- clear rubber hose;
- electric drill.

Assembly Instructions:
- Outline the outer contours of the funnel on the board, trying to do this as accurately as possible.
- Drill many holes within the drawn circle, but you should not overdo it, since the intake of dry food should be moderate.
- Take the hose and connect it to the end of the funnel. If necessary, you can use additional fasteners like a clamp.
- Make a hole in the plastic often, the diameter of which should be such that the free end of the hose fits tightly and holds well.
- Place the other end of the hose in the prepared hole. If the density is insufficient, sealant to treat the edges of the hole and the outer surface of the hose.
- Attach the funnel bell to the cutting board, having previously treated the circle contour with holes with sealant. Place a funnel on the circle and hold it in this way until the sealant dries.
- Connect one end of the hose to the cup and the other to the funnel, which should be at the bottom of the board.
From a watering can through a hose, the grain will pour into the bowl itself, from where the birds can get food. At the same time, it is important to firmly fix the board so that the chickens do not succeed in overturning it.
From a plastic bucket
Having prepared a sectional bowl for animals and a plastic bucket, you can make a simple stand-alone feeder according to the following instructions:
- Make holes in the bottom of the bucket through which the feed will pour out.
- Attach a sectional bowl to the bottom of the bucket with screws.
- Fill the bucket with grain or any other food, and then close the lid.
How to make a hopper feeder from a plastic bucket, see the following video:
From PET Bottles
The simplest version of the hopper, for the manufacture of which 3 bottles of 1.5 l, 2 l and 5 m are required. The feeder is assembled in the following order:
- Cut the bottom of the bottle with a volume of 1.5 liters, and drill holes about 20 mm in diameter in a circle near the neck. Thus, it will be possible to get a hopper.
- Cut the bottom of the bottle with a volume of 2 l, leaving a side about 10 cm on it. This will be the lid of the feeder.
- Cut the bottom of the bottle with a volume of 5 l, making up a side of about 15 cm on it. This is the tank where the feed will be poured from the hopper in the future. Drill a hole in the center of the cut bottom, the diameter of which corresponds to the size of the threaded neck of a bottle with a volume of 1.5 liters. Make the same hole in a piece of plywood, which will ensure structural stability.
- Connect all the details - on the neck of a 1.5 liter bottle put the bottom of a 5 liter tank, and then a piece of plywood, and pull it all off with a cork.
- Turn over the structure so that the cork of a 1.5 liter bottle is at the bottom. So, you get a vertical hopper, inside which you need to pour grain, and after that - close the lid from the bottom with a 2 liter bottle. The food will pour out through the openings near the neck into a container made from the bottom of a 5 liter bottle.
From the canister
For such a feeder, you will need to prepare a plastic canister, a piece of pipe 10-15 cm long, fasteners and a knife. The collection instruction is as follows:
- Clean and dry the canister.
- With a knife or other tool, cut 5 holes with a diameter of 6-7 cm on the sides of the tank so that the chicken head fits freely in them.
- At the top of the canister, make a hole for filling the grain and attach it over the pipe. This means that their diameters must match. Such a trick will not allow chickens to climb inside the feeder.

To protect the feed from debris and rain, you should take care of the lid for the pipe. For example, a piece of plywood can be used for this purpose.
From the cd container
If you have an old CD container at home, you can use it to build a feeder. For these purposes, you will also need to prepare a capacious bowl and knife.
You can collect the feeder in this way:
- Clean and dry the container, and then cut 3-4 holes on its walls at a distance of 2 cm from the rim itself. The optimum diameter of these holes is 2 cm.
- Fill the container with food, and cover with a bowl on top.
- Turn over the container with the bowl and put in the chicken coop.

As you can see, there are many options for chicken feeders that you can make yourself using available materials and tools. Such simple designs will allow for competent feeding of chickens, which is one of the most important conditions for caring for them.